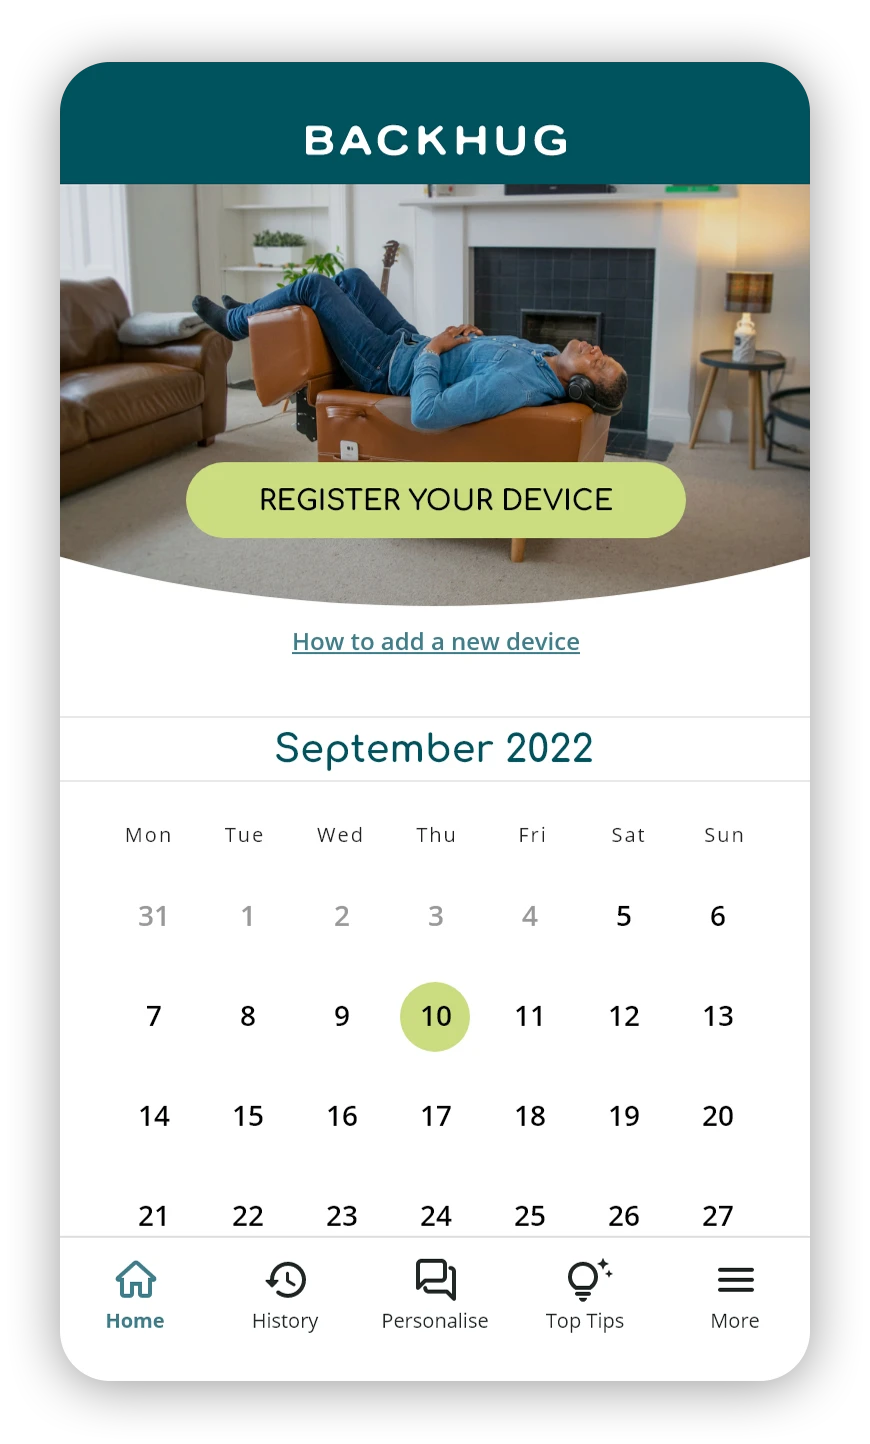
V3 User Manual
1. Important Safety Instructions
2. Installation
3. User Manual
5. Specifications
Important Safety Instructions
1.1 Before use:
DO NOT USE IF YOU:
Are pregnant
Have active cancer (except localized squamous cell carcinoma)
Have recent/planned surgical procedures
Have skin conditions or wounds on back
MEDICAL PRECAUTIONS
Consult a clinician BEFORE using if you have:
Medical electronic devices (e.g., pacemaker)
Heart disease
Back, neck, shoulder, or hip injuries/conditions
Osteoporosis
Any ongoing medical treatment
Sensitive skin or a tendency to bruise easily
If you develop bruising during or after use, stop immediately and allow skin to heal completely
IMPORTANT USAGE LIMITATIONS:
Height: 4'11" to 6'5"
Weight: 364 lbs or less
Age: 14 years and older
Adolescents aged 14-17 years must have the consent of a parent or guardian to use BackHugUsers 75+ should consult a clinician
If you have reduced physical, sensory or mental capabilities, ensure you have been given instruction on how to use the BackHug and/or use the BackHug with supervision.
If you find any rips or tears in the neoprene “membrane” (see section 2.6 BackHug Components) of the device, stop using the device immediately and contact a member of the BackHug team (5. Contact Information).
Consult your doctor if you are in any doubt as to whether or not you should use the BackHug.
DANGER
To reduce the risk of electric shock:
Always unplug this appliance from the electrical outlet immediately after using and before cleaning.
Make sure the power plug is securely inserted into a standard power socket to reduce the risk of short-circuit or fire.
Never plug/unplug the power plug from the power socket with wet hands.
Do not carry or move this appliance by the supply cord or use the cord as a handle.
Never operate this appliance if it has a damaged cord or plug if it is not working properly,
if it has been dropped or damaged, or dropped into water. Return the appliance to a service
centre for examination and repair.To disconnect, turn all controls to the off position and the remove plug from the outlet.
WARNING
BackHug has a heated surface. Persons insensitive to heat must be careful when using the appliance as temperatures sufficiently high to cause burns may occur regardless of the control setting. Do not use it on an infant or invalid or on a sleeping or unconscious person. Do not use it on sensitive skin or on a person with poor blood circulation. Check the skin in contact with the heated area of the appliance frequently to reduce the risk of blistering.
To reduce the risk of burns, fire, electric shock, or injury to persons:
An appliance should never be left unattended when plugged in.
Unplug from the outlet when not in use, before putting on or taking off parts.
Do not operate under a blanket or pillow. Excessive heating can occur and cause fire, electric shock, or injury to persons.
Close supervision is necessary when this appliance is used by, on, or near children, invalids, or disabled persons.
Use this appliance only for its intended use as described in this manual. Do not use attachments not recommended by the manufacturer.
Keep the cord away from heated surfaces.
Never drop or insert any object into any opening.
Do not use outdoors.
Do not operate where aerosol (spray) products are being used or where oxygen is being administered.
Never, use pins or metallic fasteners with this appliance.
Carefully examine the covering before each use. Immediately stop using the appliance if the covering shows any sign of deterioration, such as checking, blistering, or cracking. Contact Pacla Medical support team at hello@paclamedical.com
Keep dry - Do not operate in wet or moist conditions
Movable leg rest support
Keep children and pets away from the extended leg support
GROUNDING INSTRUCTIONS
This product must be grounded. If it should malfunction or break down, grounding provides a path of least resistance for electric current to reduce the risk of electric shock. This product is equipped with a cord having an equipment-grounding conductor and a grounding plug. The plug must be plugged into an appropriate outlet that is properly installed and grounded in accordance with all local codes and ordinances.
DANGER – Improper connection of the equipment-grounding conductor can result in a risk of electric shock. Check with a qualified electrician or serviceman if you are in doubt as to whether the product is properly grounded. Do not modify the plug provided with the product – if it will not fit the outlet, have a proper outlet installed by a qualified electrician.
For the use of BackHug provide with US plug, grounded, cord-connected product rated less than 15 amperes and intended for use on a nominal 120-volt supply circuit, the instructions in either (1) or (2):
This product is for use on a nominal 120-volt circuit, and has a grounding plug that looks like the plug illustrated in sketch A in Figure 1.1 (drawing below). A temporary adapter that looks like the adapter illustrated in sketches B and C may be used to connect this plug to a 2-pole receptacle as shown in sketch B if a properly grounded outlet is not available. The temporary adapter should be used only until a properly grounded outlet (sketch A) can be installed by a qualified electrician. The green colored rigid ear, lug, or the like extending from the adapter must be connected to a permanent ground such as a properly grounded outlet box cover. Whenever the adapter is used, it must be held in place by a metal screw.
This product is for use on a nominal 120-volt circuit and has a grounding plug that looks like the plug illustrated in sketch A in Figure 1.1 (drawing below). Ensure the product is connected to an outlet with the same configuration as the plug. No adapter should be used with this product.
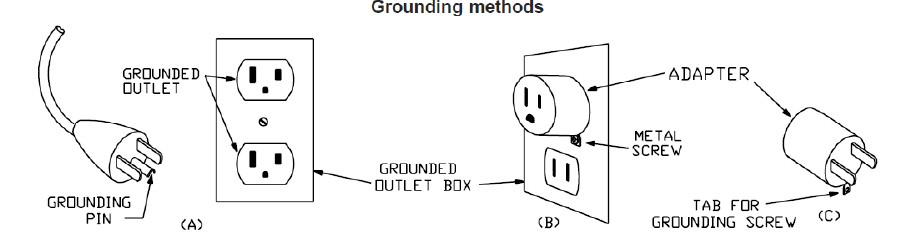
Figure 1.1: Left (A), Right (B)
1.2 During use:
DO NOT attempt to stand or sit on the “membrane”, “finger mechanism” (see section BackHug Components) or “leg rest” in order to prevent accident or injury to yourself or damage to the BackHug.
Do not start the BackHug session unless you are lying on the device. Do not use the device for the head, abdomen, elbows or knees. When climbing on or off BackHug, be careful of the risk of falling.
DO NOT allow children or pets near the device during use.
Do not allow the BackHug's moving parts to come into contact with any swollen or inflamed parts of the body.
DO NOT use the device for more than 60 minutes at a time or a total of 60 minutes within 24hrs.
Always wear clothing when using the device; only treatment of the neck area should be in direct contact with bare skin.
When using the BackHug, DO NOT twist your body and always try to maintain a straight posture.
If you experience pain while using the BackHug, stop using the BackHug immediately.
Use the BackHug as instructed in this manual and in particular adhere to the treatment duration and usage guidelines stated in this manual.
Do not attempt to place fingers/hands in the cavity beneath the leg rest when leg rest is extended. Doing so during the ‘extension’ or ‘retraction’ motion may cause you injury.
1.3 After use:
Always unplug the device from the electrical outlet before cleaning.
We recommend using a vacuum cleaner to remove dust or hair from and wet wipes to clean the upholstery and membrane. If you want to use liquid product to clean the BackHug, please spray the product onto a lint-free cloth and not directly onto the device (see Cleaning Your BackHug device for more detailed instructions)
DO NOT wet the upholstery and in particular the “membrane” as this could cause water damage to the internal mechanism.
Repeated use of BackHug, particularly with strong pressure settings, may leave marks or cause dry skin or skin discolouration from time to time. This effect can be mitigated by wearing extra layers of clothing or placing a blanket or other softening layer on the device during treatment.
1.4 Important Information Regarding Symptoms you May Experience After Using BackHug:
After you use BackHug, you may experience increased discomfort or have the impression of an increase in your back pain-related symptoms. This is a recognised phenomenon that therapists refer to as "initial aggravation" and is expressed in the common phrase “it gets worse before it gets better.” Initial aggravation is often experienced by people receiving manual therapy. In a similar way, because BackHug treatment stimulates key points in your back and loosens your joints, your body may undergo an initial adjustment in response to BackHug treatment. Initial aggravation has also been observed to occur in people receiving other forms of therapy. This is considered to be a symptom of the healing process. The initial aggravation that may occur does not necessarily mean you should not use the BackHug, but if in doubt please contact a member of the BackHug team (5. Contact Information), so we can discuss your symptoms with you, or consult your physician or therapist.
In case of any excessive discomfort relating to pre-existing spinal conditions, distinct hypertension, cardiovascular diseases or dizziness, please reduce the intensity of usage (duration & strength) in the first instance. If the initial aggravation leads to continued excessive discomfort, please stop the session and consult a medical doctor immediately to clarify if, and under which circumstances, you should continue to use the BackHug.
Because the treatment pressure can be firm and strong, repeated BackHug use over time can leave pressure marks on your back or even bruises (see illustration below). In that case, please leave enough of a gap between the sessions to allow your skin to recover. We recommend you take 3-4 BackHug sessions weekly, but you should choose a frequency of treatment that does not damage your skin.
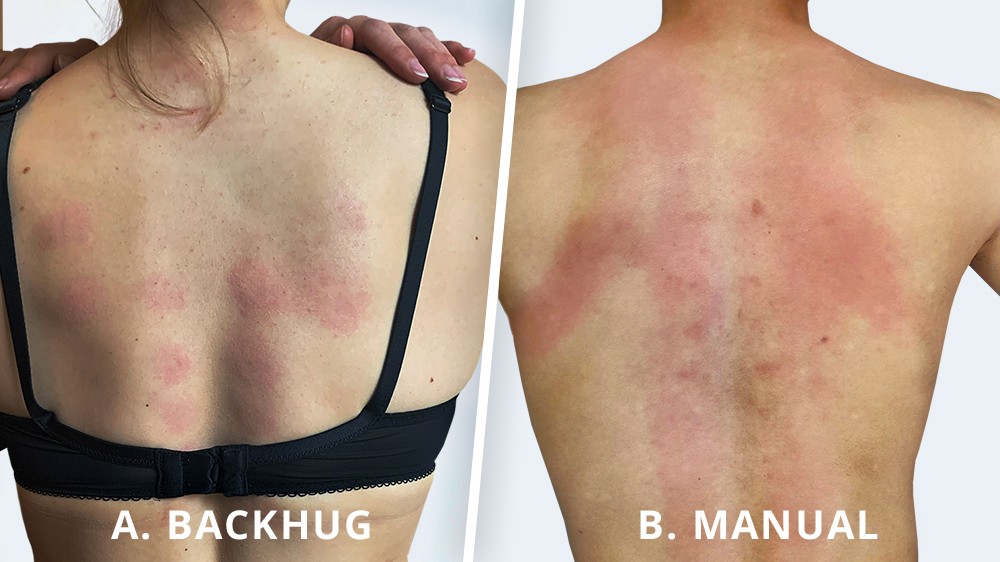
Figure 1.2: Example of "red marks" that may appear on the user's back as a result of finger pressure from BackHug (left) and manual therapy (right). This is a common side-effect of manual therapy and is not usually something to worry about. If you are in any doubt please consult your physician.
Installation
Important
The BackHug device is heavy. Please ensure you have assistance when lifting. .
Don’t cut into the cardboard deeper than 1cm as this may damage the upholstery.
You may be required to keep your cardboard box, please refer to your customer agreement.
2.1 Unpacking Your BackHug
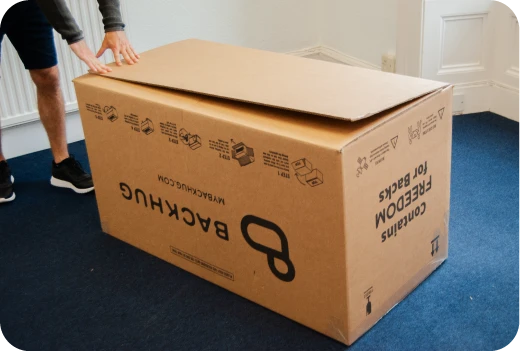
Take the BackHug device out of the cardboard box, fold up the box and store safely.
To take the BackHug device out, we strongly recommend you gently turn the cardboard box on its side and slide the BackHug device out
Reminder: BackHug is heavy (42kg) so you might want to ask for help when lifting and/or moving it)
If you took the BackHug device out of the box by sliding it out on its side, keep it on its side in order to safely access the power supply. If the BackHug device is not on its side after you took it out of the box, gently turn it on its side in order to safely access the power supply.
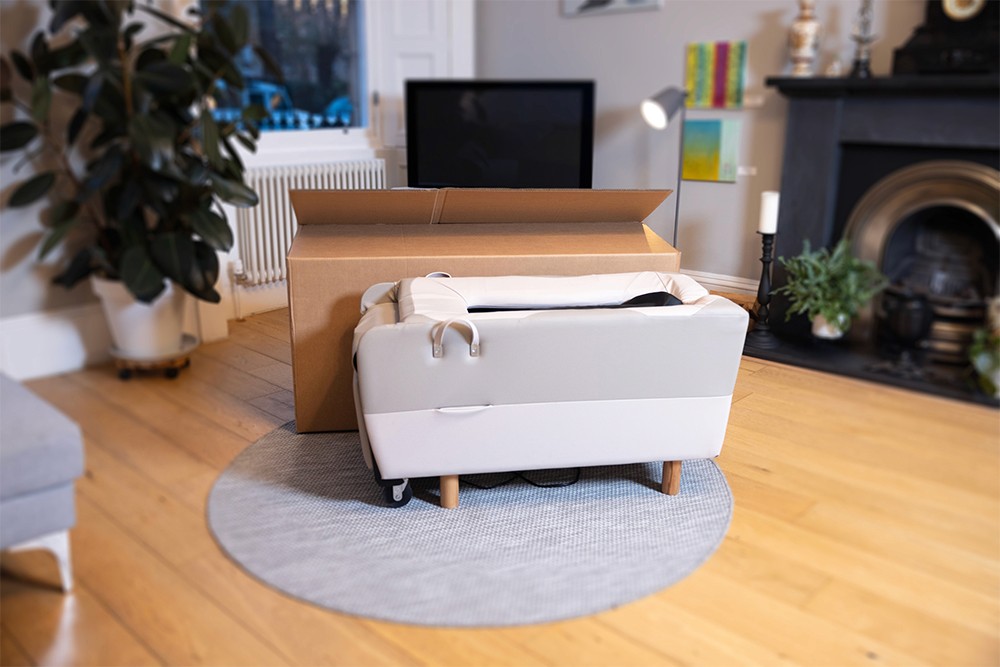
Figure 2.1 – The BackHug device comes out of the box all ready to use - all you will need to do is attach the power cord (see: 1.3 Connecting Your BackHug to the Power Socket)
2.2 What Your Package Should Contain
1x BackHug Device
1x Power Cable With Plug
2.3 Connecting your BackHug to the Power Socket
With the device on its side, insert the power cord into the BackHug device (see figure 1.2 for location of power supply). Please make sure the BackHug device's on/off switch is flicked to “O” for "off" (see Figure 1.3) for safety before proceeding.
Carefully lift the BackHug device and place it down so it is standing on all 4 wooden legs (See figures 1.4 and 1.5 for reference). Reminder: BackHug is heavy (42kg) so you might want to ask for help when lifting and/or moving it).
When positioning the appliance before use ensure adequate space is allowed for the leg rest to raise from its retracted position. We recommend at least 80cm of the space from the back of BackHug. (See figure 1.6 for reference)
Insert the mains plug into a mains socket and make sure the power is switched on at the socket.
Reach under the BackHug device and flick the on/off switch to "I" for "on" (see Figure 7). You should hear the sound of BackHug's motors after switching it on, this lets you know it is working properly and ready to use.
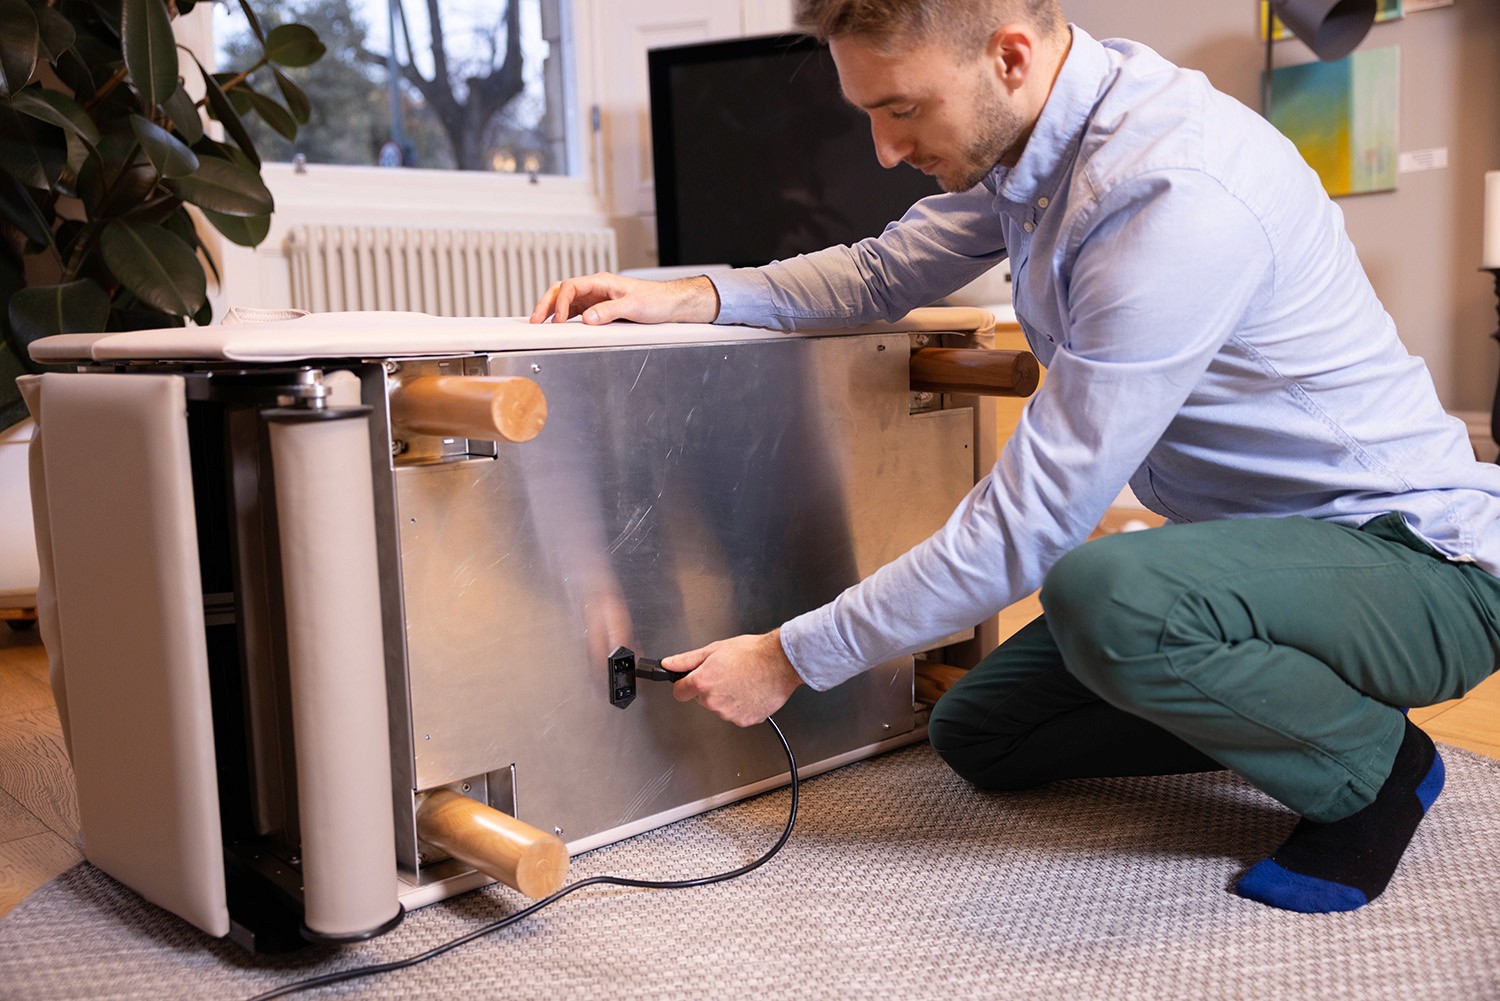
Figure 2.2 – Turn the device on it's side so that you can easily access the power socket
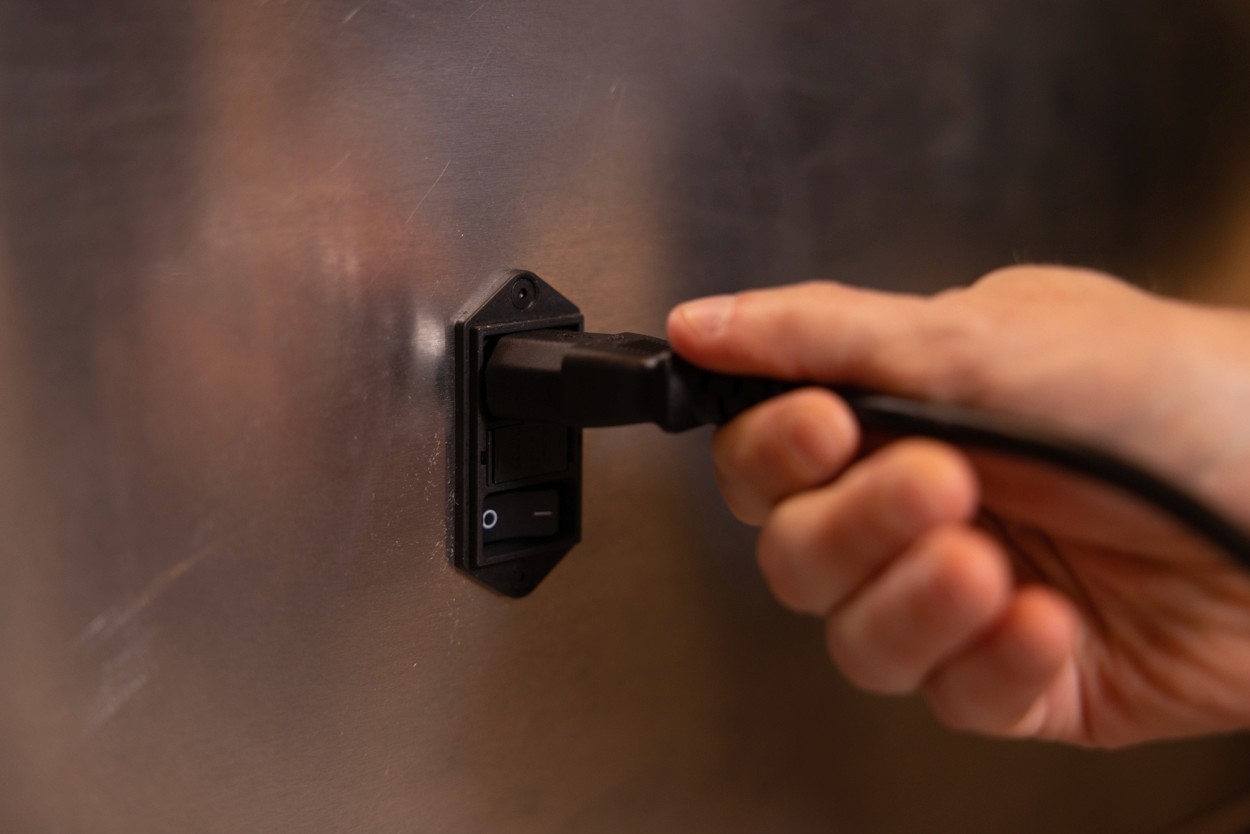
Figure 2.3 – Push the cord into the socket and make sure the switch is set to the "O" position to close power supply (switch it back to "I" once the device is plugged into the mains)

Figure 2.4 – It is recommended that two people lift BackHug, as shown above, when moving the device or placing it down.
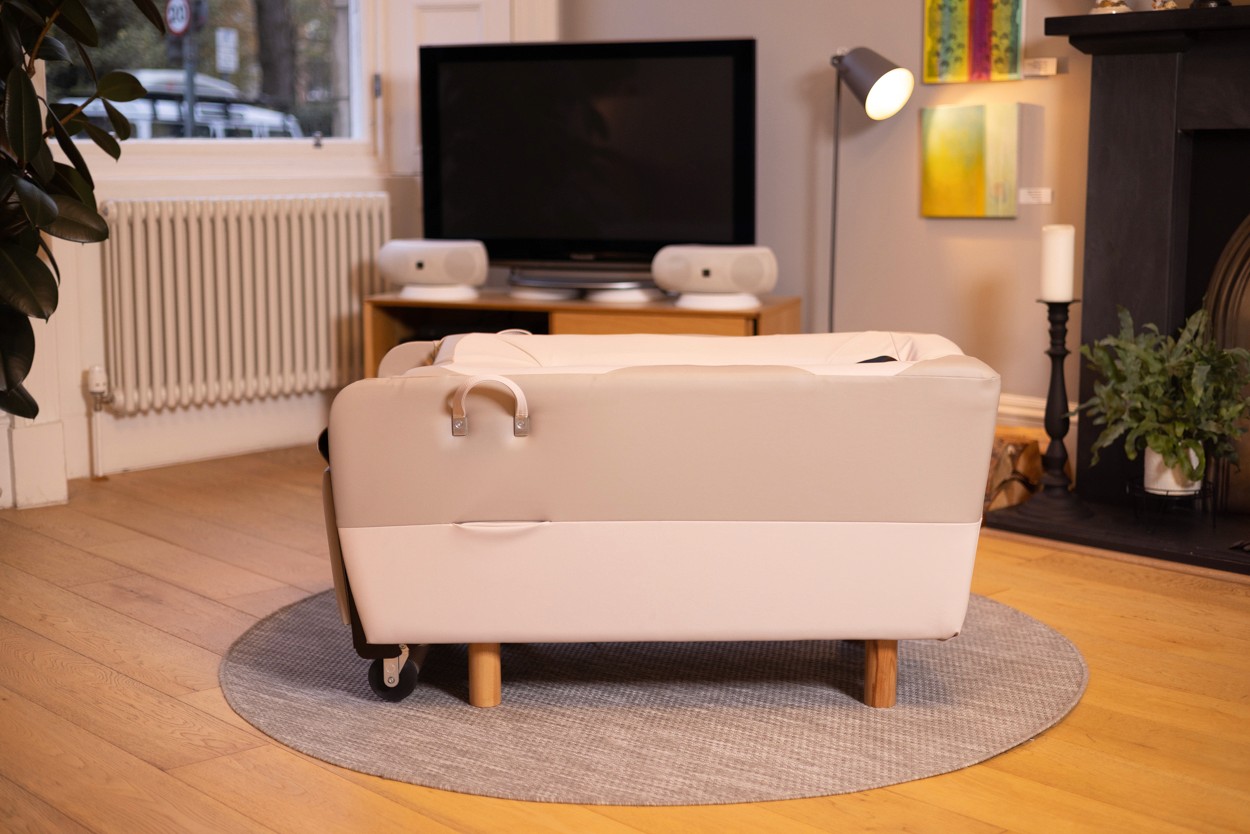
Figure 2.5 – BackHug should be placed on all 4 legs
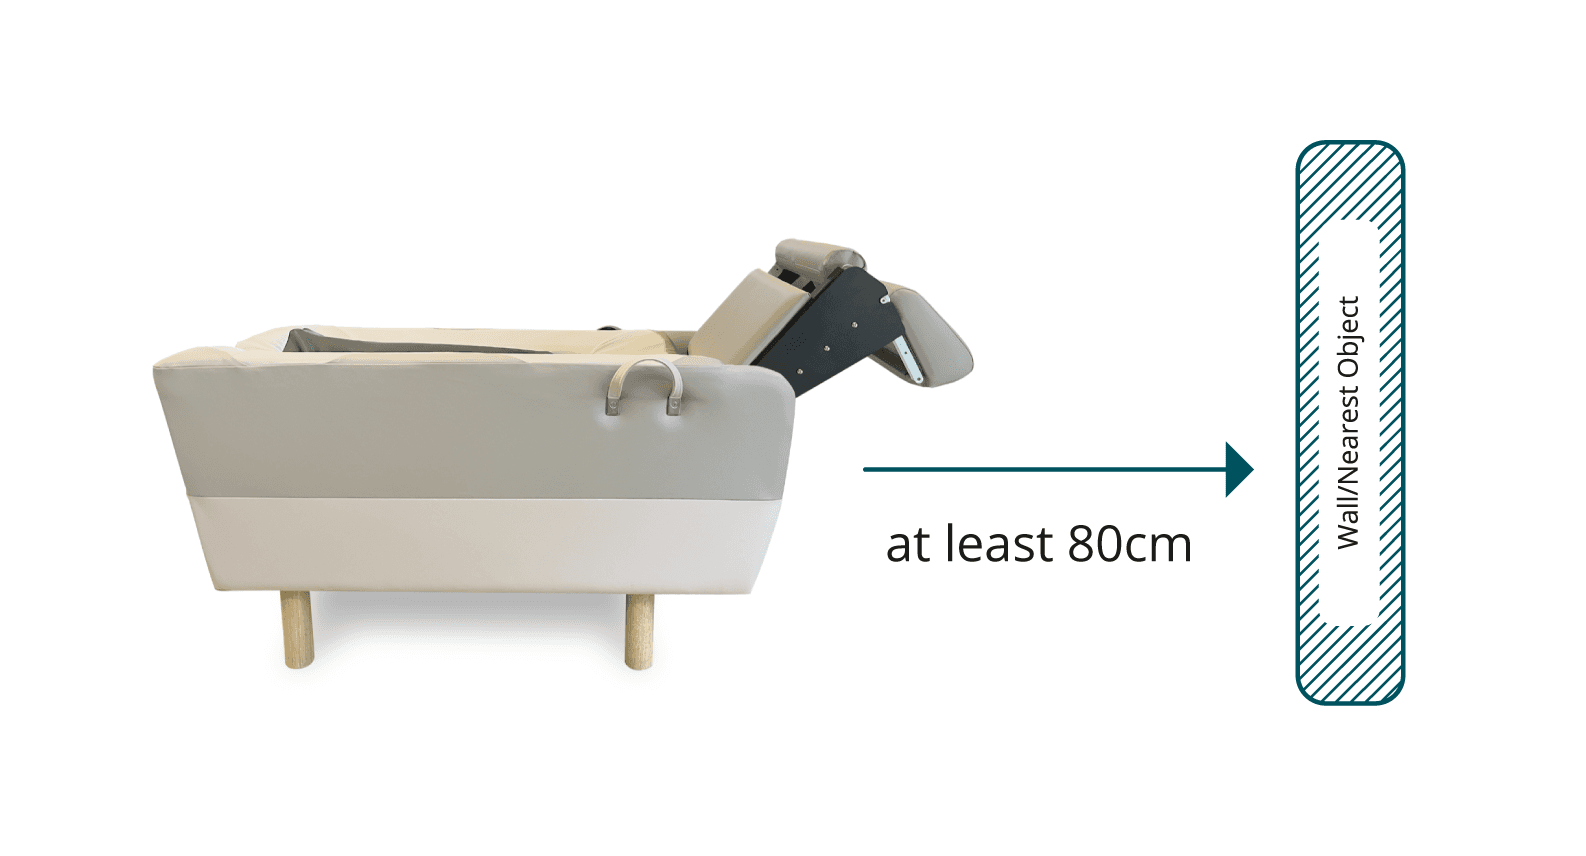
Figure 2.6 – Ensure adequate space is allowed for the leg rest to raise from its retracted position
User Manual
3.1 Notice To Users
This device complies with safety testing to the following standards:
IEC 60335-2-32:2019 used in conjunction with IEC 60335-1:2010, COR1:2010, COR2:2010, AMD1:2013, COR1:2014, AMD2:2016, COR1:2016 - Household and similar electrical appliances + particular requirements for massage appliances
The product also fulfils the requirements of:
(EU) European group differences, special National conditions and National A-deviations according to EN IEC 60335-2-32:2021 in conjunction with EN 60335 1:2012 + A11:2014 + A13:2017 + A1:2019 + A14:2019 + A2:2019 + A15:2021
(CA) CSA C22.2 No. 60335-2-32:20 & CSA-C22.2 No. 60335-1:16
EN55014-1: 2006 + A1:2009 +A2: 2011 Electromagnetic compatibility – Requirements for Household appliances, electric tools and similar apparatus – Part 1: Emissions
EN55014-2: 2015 Electromagnetic compatibility – Requirements for Household appliances, electric tools and similar apparatus – Part 2: Immunity – Product family standard
EN61000-3-2: 2014 – Electromagnetic compatibility (EMC) – Part 3-2: Limits – Limits for harmonic current emissions equipment (input current up to an including 16A per phase).
EN61000-3-3:2013 – Electromagnetic compatibility (EMC) – Part 3-3: Limits – Limitation of voltage changes, voltage fluctuations and flicker in public low-voltage supply systems, for equipment with rated ≤16A per phase and not subject to conditional connection.
BackHug upholstery is antimicrobial and conforms to ISO 22196, ASTM G21, Independent testing has verified that the material is effective at reducing the spread of MRSA, Ecoli and other similar bacteria.
3.2 Product Features
26 Robotic Fingers: 26 robotic fingers target the centre of your back, neck and shoulder blades to reduce stiffness
Wing Feature: Four of the 26 robotic fingers are specifically designed with a "wing feature" to target the shoulder blades and relieve the stiffness around the two large shoulder blade joints.
Self-Serviced: The device is fully automated and easy to use. Software updates are completed remotely through Wi-Fi or the user's Bluetooth.
Personalised: Everybody’s back is different, so the robotic fingers will adapt to your back shape and size using patent-protected finger pivot technology.
Smartphone Control: You can download the BackHug user App on your smartphone and use it as a remote handset control via Bluetooth. This allows for individualised therapy in which you can select your own programme, strength, speed, treatment area, duration, and more. Anyone in your household can use the BackHug with the App.
Custom User Profile: Our App will save your settings for future use. Less stress for the body and brain 😀
Adjustable Force: A key treatment setting is treatment strength. You can adjust this, like all the other settings, at any time during the session. In general, the stronger the pressure, the greater the therapeutic benefits, but you should always be comfortable during treatment. As your body relaxes during treatment, you may find that you are comfortable at higher strength settings. In that case you may wish to increase the treatment strength during the session.
Heating Pads: The upholstery of your BackHug can be heated in two areas (the left and right side of the back) for extra comfort and therapeutic benefit. You can adjust the heat to be either low, medium or high, or, alternatively, you can turn it off completely.
Back Tension Tracking: After each session, you can check how much deep, therapeutic relaxation has taken place by tracking the tension in your back. A session must be at least 20 minutes in order to generate back tension results.
3.3 Introducing Your BackHug Device
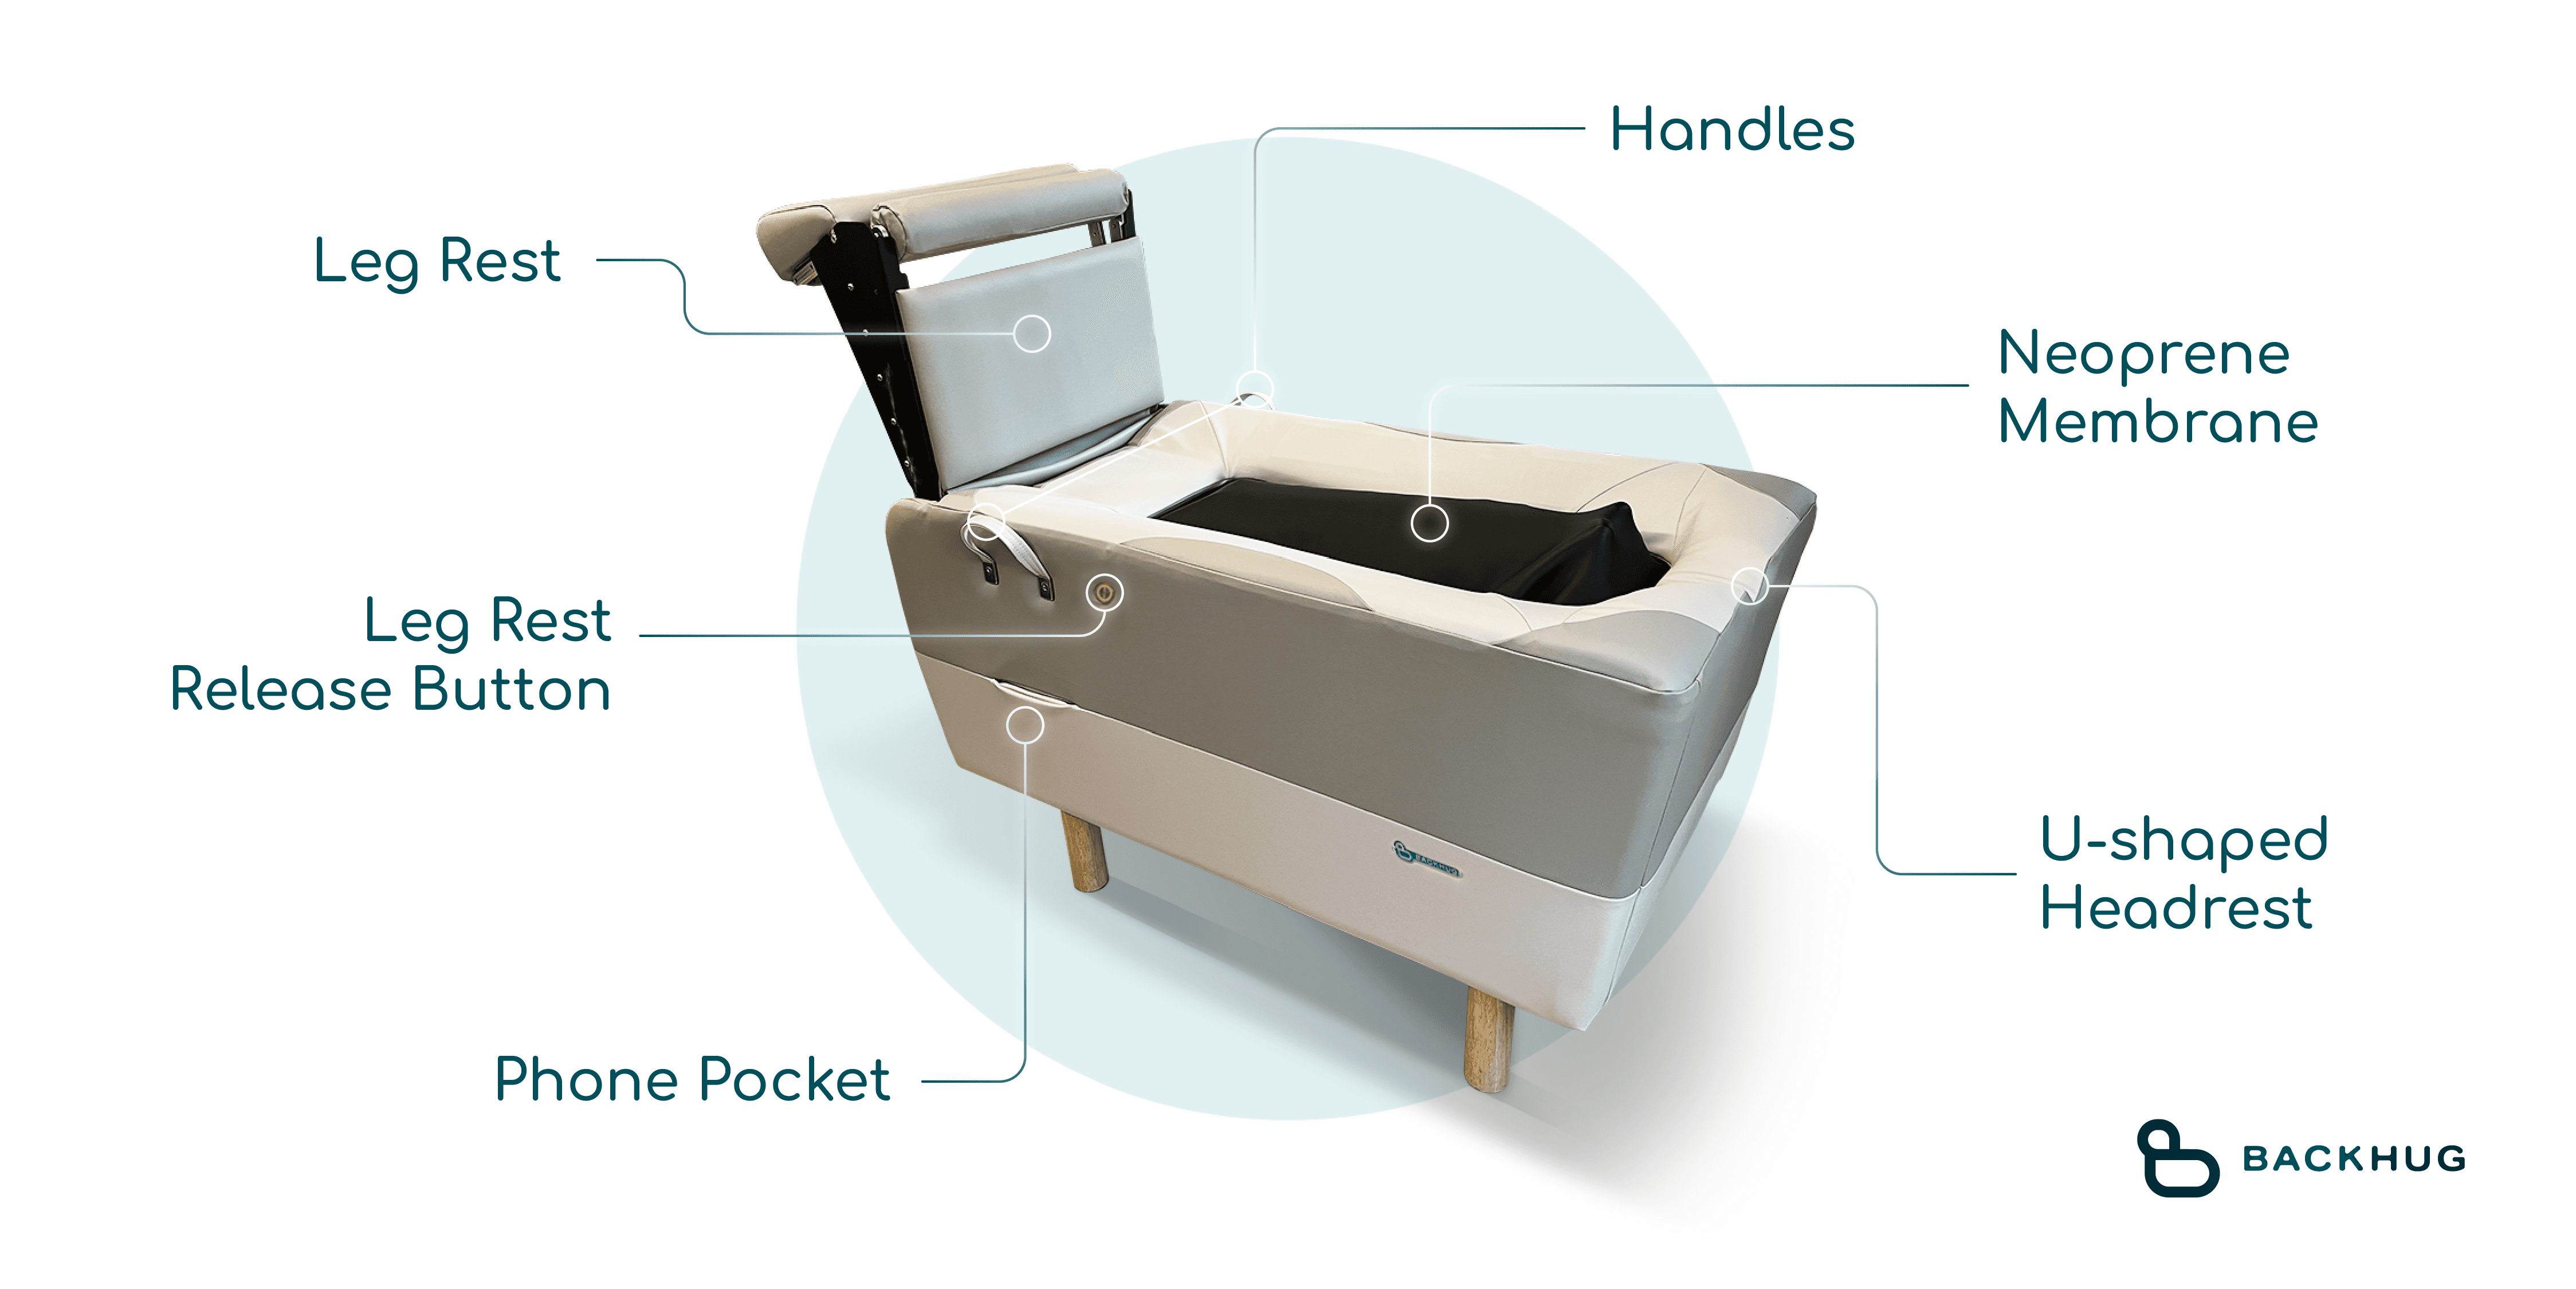
Figure 3.1 - The key parts of your BackHug device
3.4 Automated Leg Rest
3.4.1 Positions
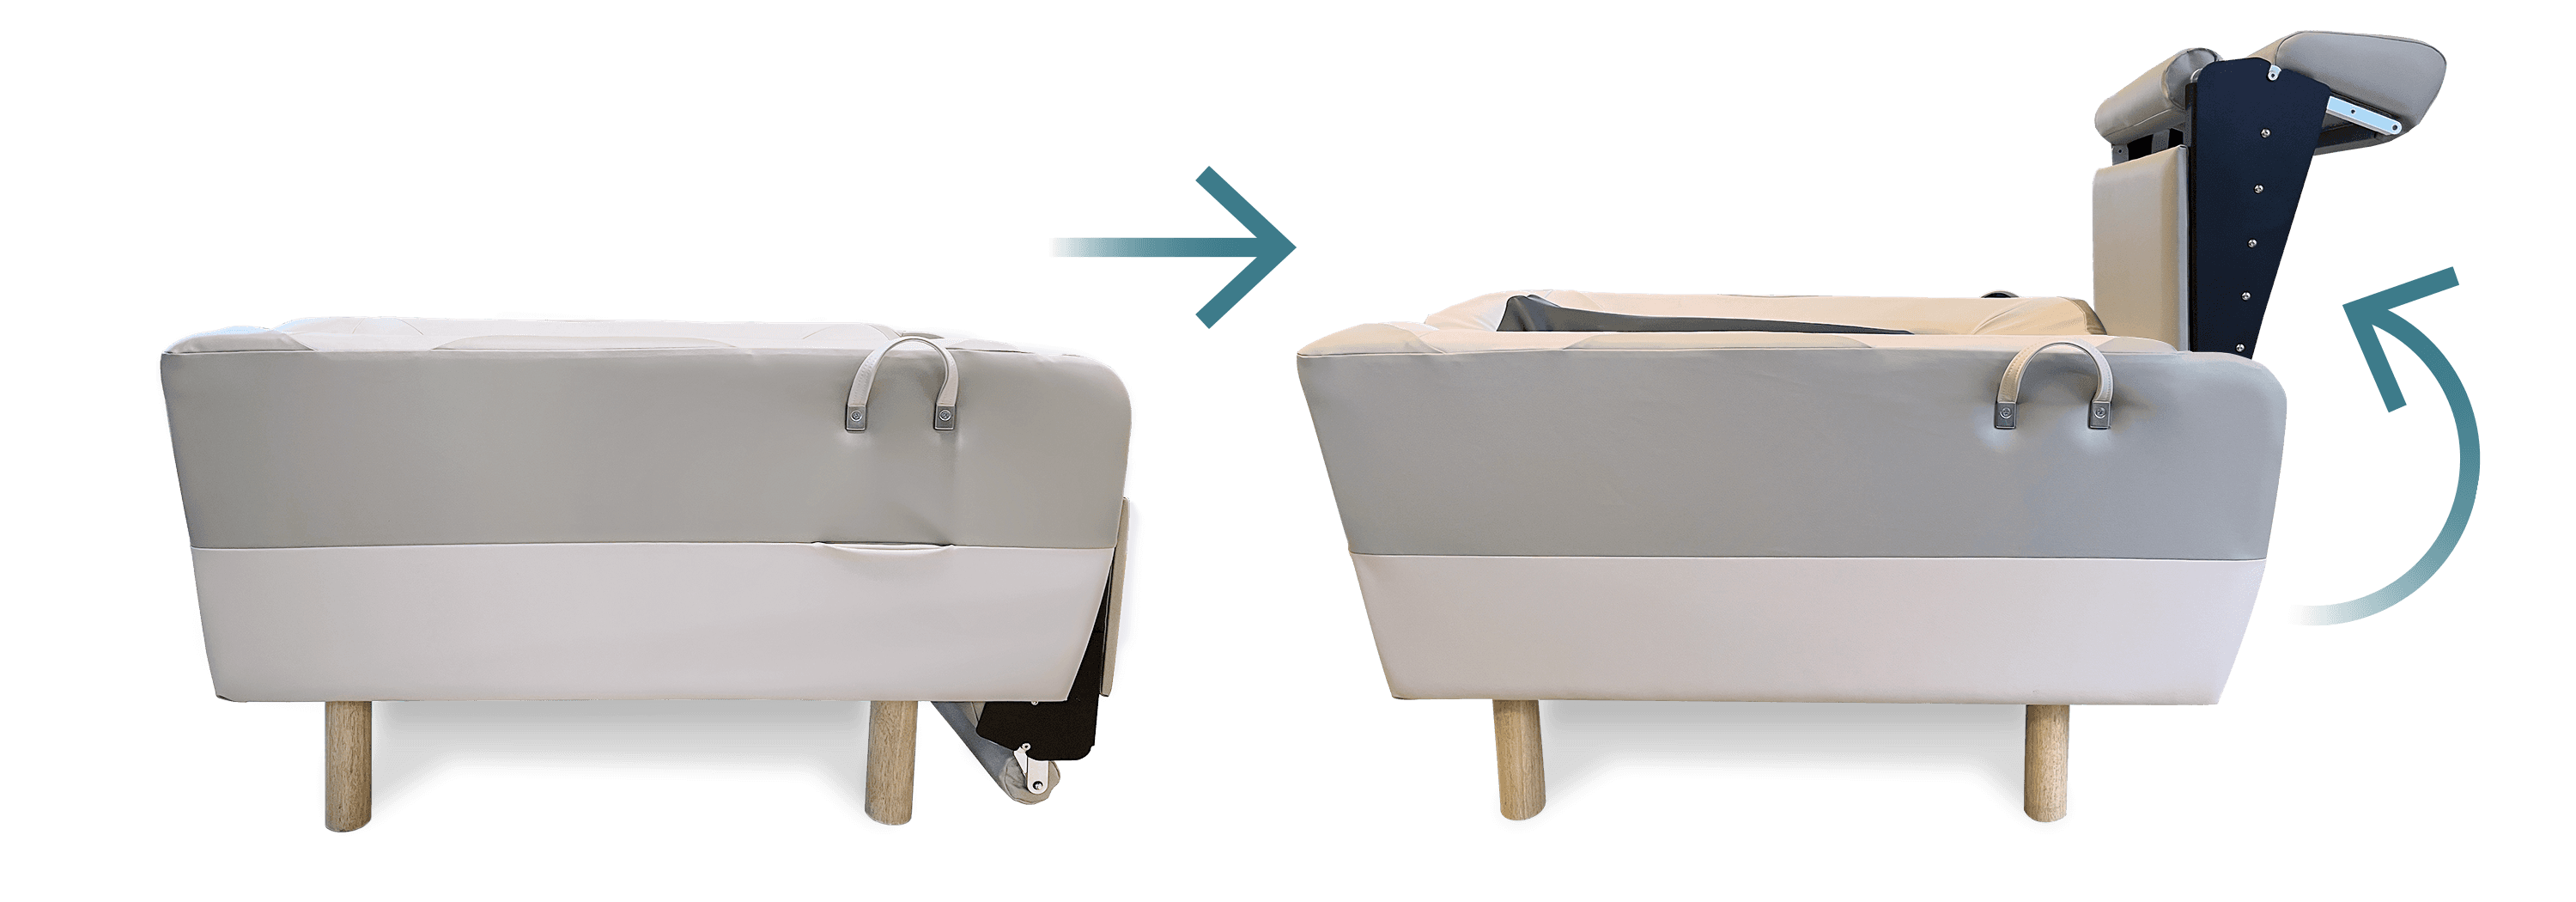
Figure 3.2 - BackHug leg rest from parked to extended position
3.4.2 Control
The leg rest mechanism is controlled by the BackHug user app installed on your smartphone.
The leg rest will automatically raise the user’s legs once you start the session.
Once the session has finished the leg rest will automatically lower your legs back down as it returns to the parked position.
3.5 Leg Rest Release Button
On the side of your BackHug device, you will find a metal button with a red ring around it (see figure 3.3), this is the 'Leg Rest Release' button. This will stop the leg rest from moving in case of an emergency.
Please note that the button is there for safety, and should be used only if there is a safety concern such as something being stuck in the mechanism. The button should not be used for starting or stopping your session. For that, just use the BackHug app.
Do not attempt to place fingers/hands in the cavity beneath the leg rest when leg rest is extended. Doing so during the ‘extension’ or ‘retraction’ motion may cause you injury.
It is important to exercise caution when the leg rest retracts. Keep pets and children away from the device. In case of emergencies, press the 'Leg Rest Release' button immediately.
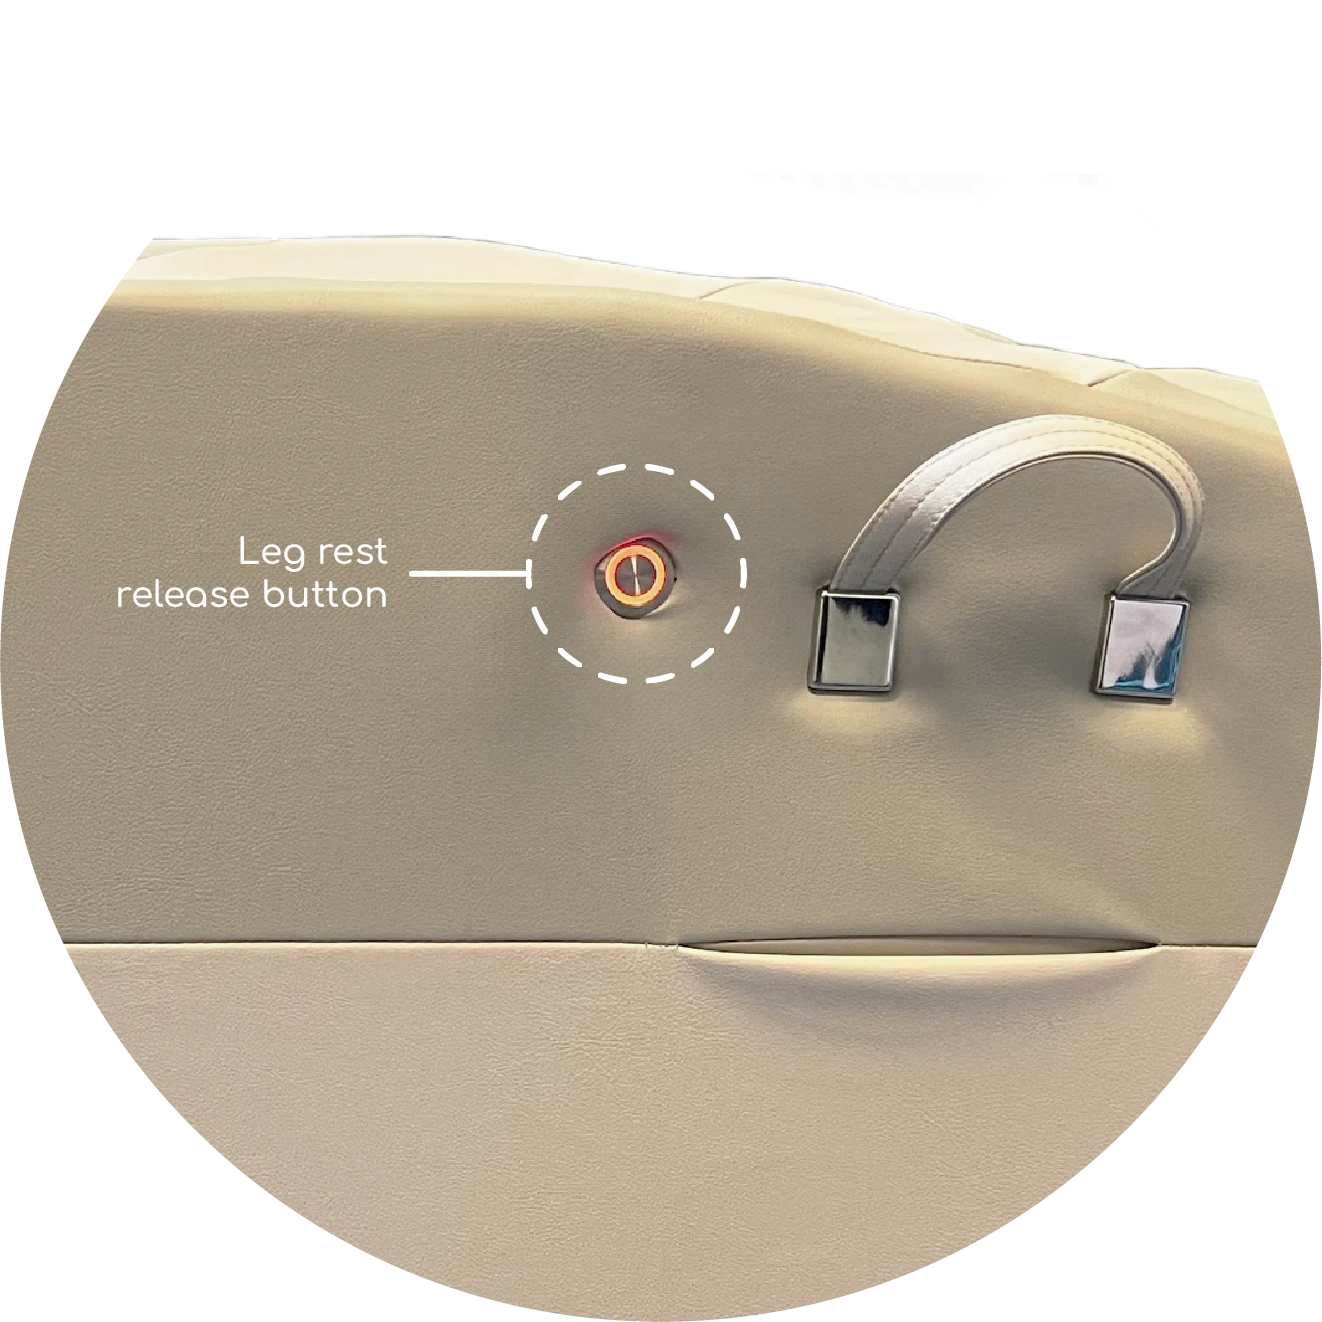
Figure 3.3 - BackHug leg rest release button, located by the handles
3.6 Therapy Program Modes
The BackHug has a variety of program modes which are detailed in the BackHug user app, such as Neck Focus and Lower Back Focus.
Each program mode provides a different type of therapy, allowing you to personalise the session to your individual needs.
The robotic fingers are divided into four separate sections, treating the neck, shoulder blades, mid back and lower back.
The BackHug App allows you to control the strength of the pressure delivered to you by each robotic finger section independently, to give you the choice of focusing on specific areas of the back.
The lower back section can be adjusted by disabling the lowest fingers, which you can do on the App (you will find more information about this in the App). This is recommended for users under 180cm (or 5ft 11 in) for a comfortable treatment.
The device offers three speeds; fast, moderate, and slow. These speeds allow you to adjust the flow of the robotic fingers, tailoring the intensity of the treatment to your needs.
3.7 Setting up your BackHug device
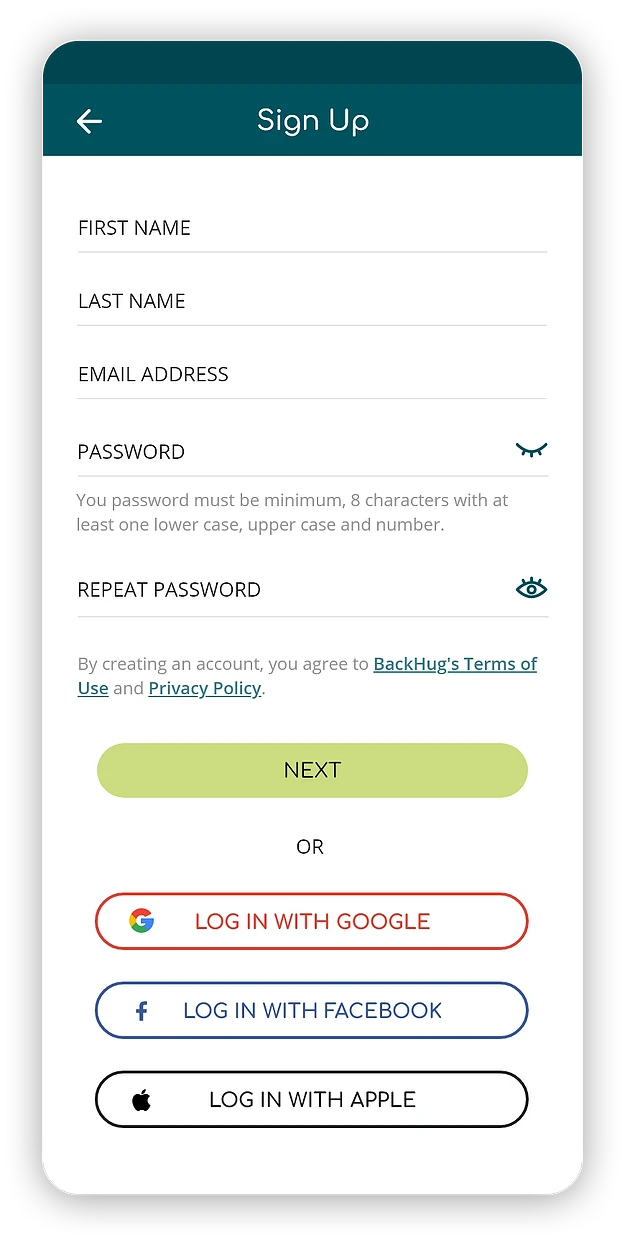
Download the “BackHug” App from the Google Play Store if using an Android smartphone or from the App Store if using an Apple smartphone.
Create a user profile by registering for an account on the BackHug App.
Go to your email, find our email and click “confirm registration”.

Log into the BackHug App and press “Register” to add your home device
Please note: enable Bluetooth (if using an Apple smartphone) OR Bluetooth and location (if using an Android smartphone)
A coloured tab should appear with an option to connect to the device. Select “Connect”.

A pop up will appear confirming that a home device has successfully been added to your profile. Click OK.

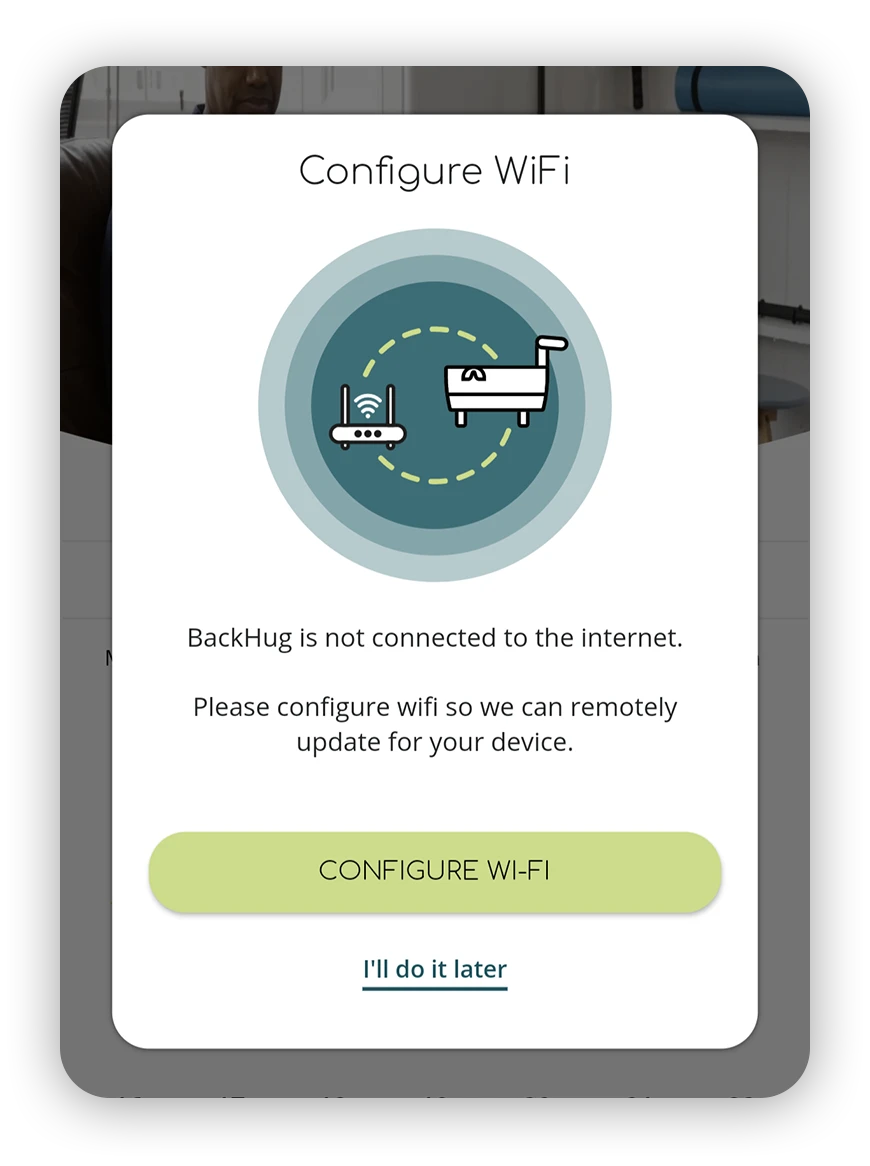
You will be asked to configure your device to your WiFi network (this is important for software updates for your device).
The BackHug device is now set up and ready for home use.
3.8 Before Receiving Your BackHug session
Please do not wear sharp jewellery, belts or any other accessories that may damage the upholstery
Please always wear soft, light clothing for each session, in order to prevent scratches and tears from occurring on the outer upholstery material.
Please ensure the bed is in the parked position, with the leg rest retracted (Figure 2.4) when you get onto the device:
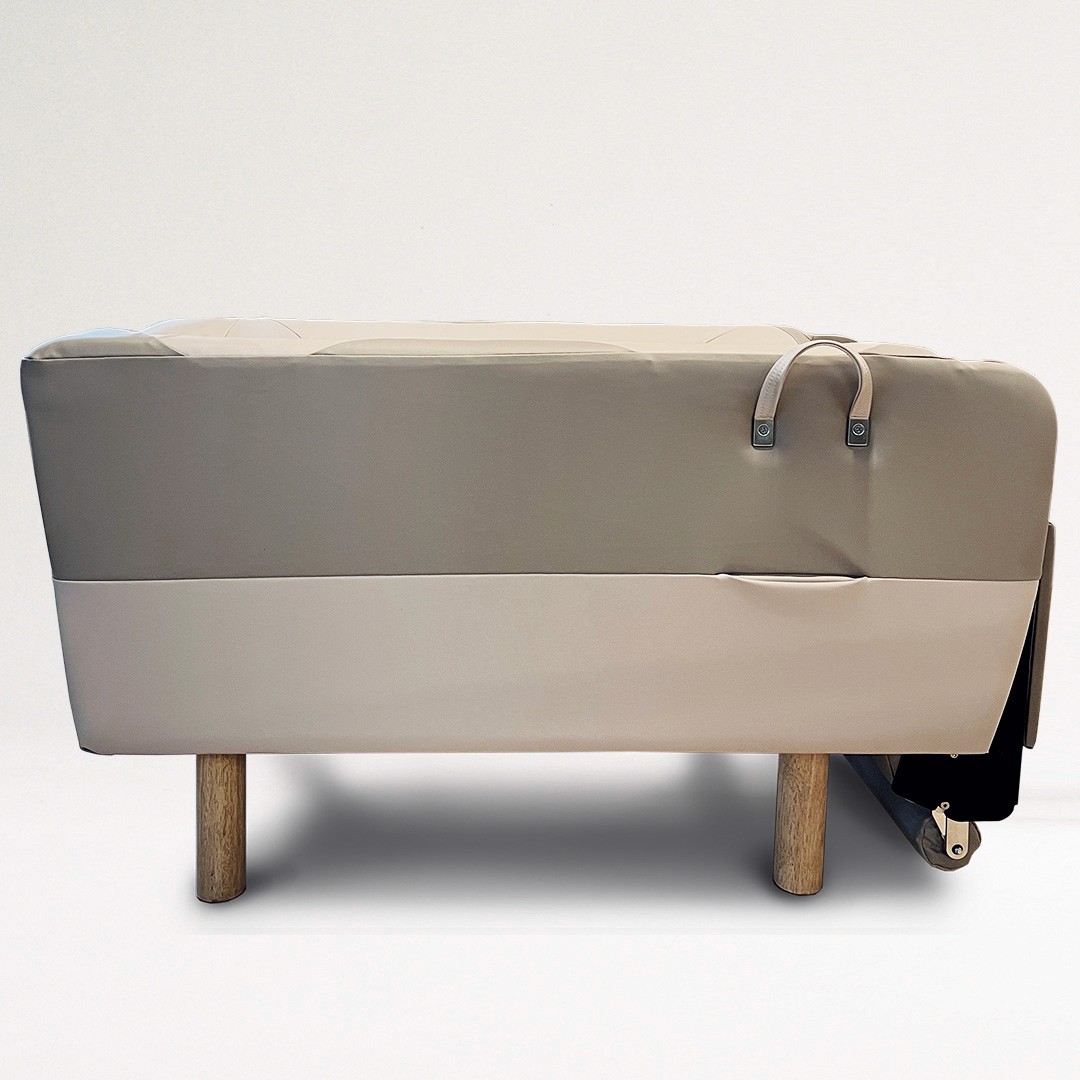
Figure 3.4 – BackHug leg rest in the fully parked position
3.9 How to Operate and Get Treatment from your BackHug
Select your BackHug device on the screen, choose your desired “Session Duration” and then “Session Settings” before starting your session by pressing “Start”.
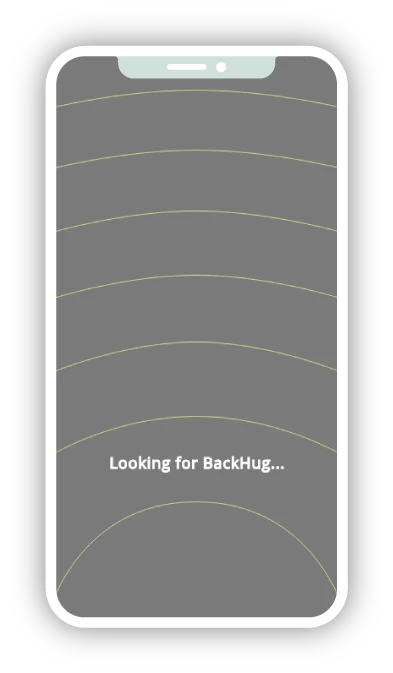
Figure 3.5 – BackHug app screen showing "Searching for Device" screen

Figure 3.6 – BackHug app screen showing duration selection - we recommend having a session for at least 20 minutes in order to experience therapeutic benefits

Figure 3.7 – BackHug app screen displaying the multiple setting options to personalise your session - we recommend starting an in-app consultation to get the best results for your needs
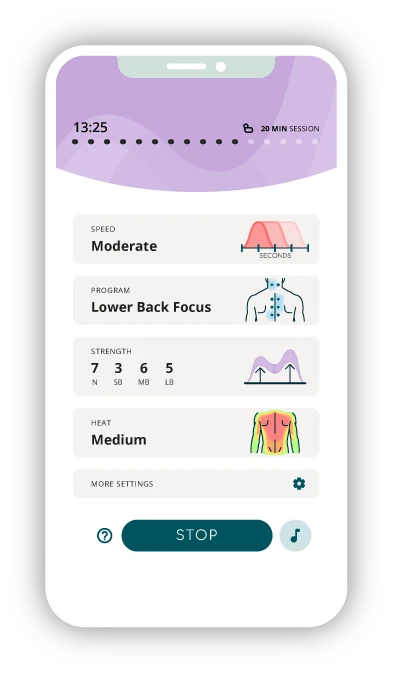
Figure 3.8 – BackHug app screen showing how the app appears during a session. Setting can be adjusted in real-time, so play around and find what feels right for you
3.10.1 Setting it up
The set-up is the same as described in 2.9 - Setting Up your BackHug Device.
If you ordered Privacy Dividers, our standard three 1m x 1.8m panels Privacy Dividers are shipped pre-assembled in the box for you to place in any location you choose. Instructions for non-standard Privacy Dividers will be communicated to you if you order them at the time of your order.
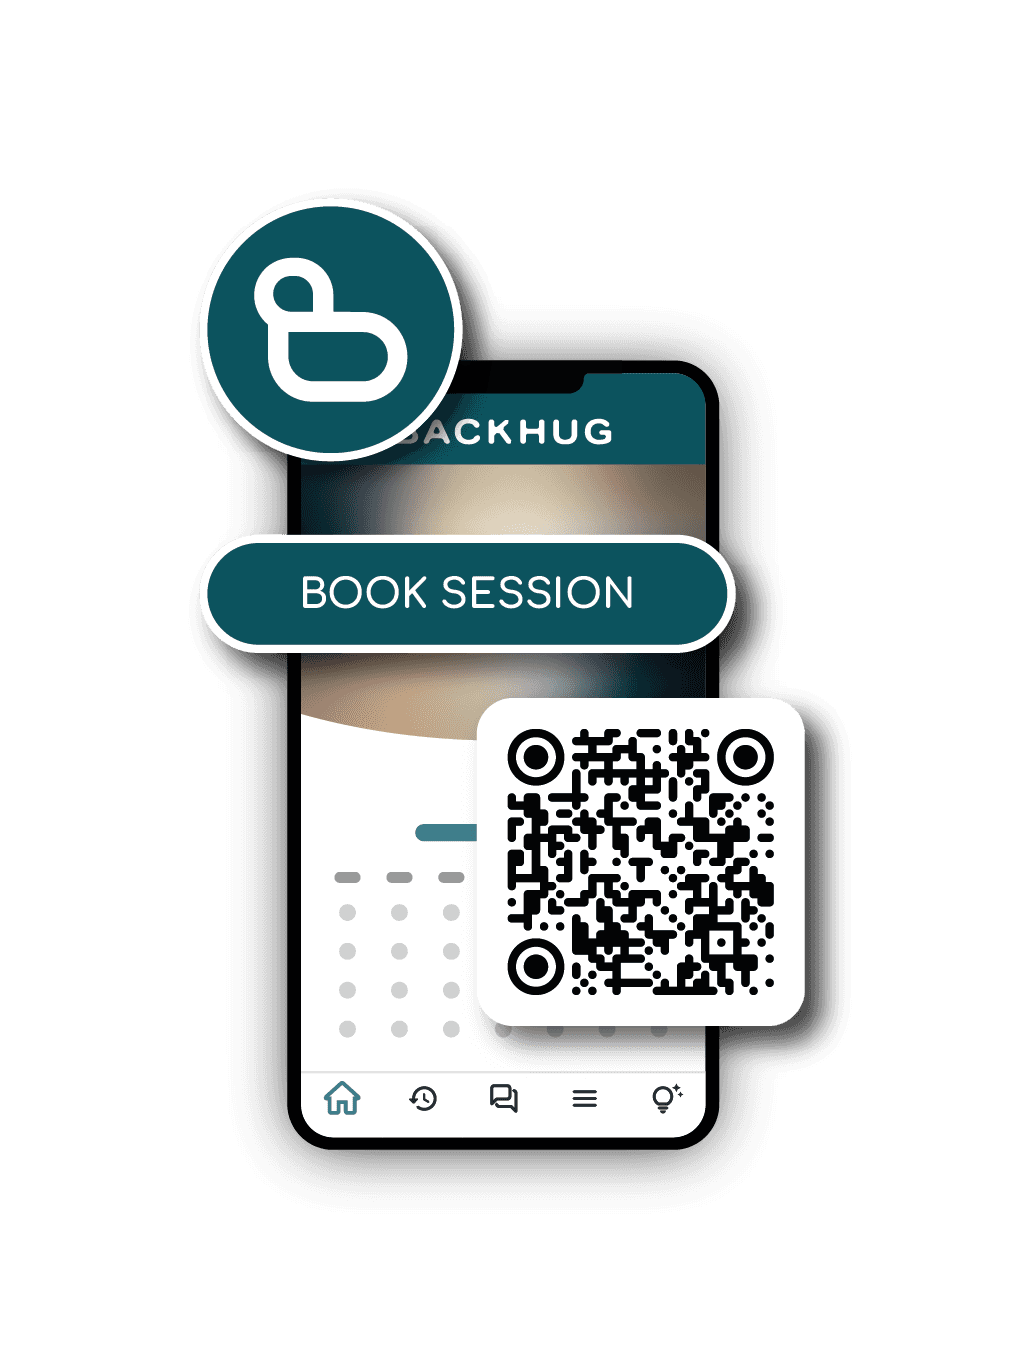
3.10.2 How to book a session
info and relevant app screens needed
3.11 Cleaning your BackHug Device
Always make sure your BackHug device is switched off by unplugging it at the mains socket before cleaning it.
We recommend that you clean your BackHug device before and after every session.
A damp cloth (never wet!) can be used to clean the upholstery.
Never spray anything directly onto the BackHug device. Instead, always spray any cleaning liquid you use onto a cloth first and then proceed to wipe the BackHug device clean with that cloth. We recommend using an anti-bacterial spray to clean the shiny faux leather part of the bed (Figure 2.9):
Any spills should be cleaned immediately to prevent staining of the outer material.
Always use a clean, dry, cloth or tissue to wipe the area off after cleaning.
Only use non-toxic cleaning agents to clean the outer upholstery material in case they come into contact with your skin.
Please pay special attention to the neck area and handles on the BackHug device when cleaning them as they are exposed to users' bare skin.

Figure 3.9 – Always spray cloth NOT directly onto BackHug before wiping

Figure 3.10 – You can also clean the neoprene layer of the device. Remember to spray onto the cloth and then wipe, and not to spray directly onto the neoprene.
3.12 Warning
Do not under any circumstances attempt to remove the upholstery, open the device or tamper with its internal mechanism.
The device is the property of Pacla Medical Limited and is made available for use on the strict condition that any cutting, removal or disconnection of the neoprene layer (“membrane”) on the top of any device or any removal or disconnection of the upholstery of any device or any other action which allows the mechanical parts of any device to be visible is strictly prohibited.
It is also illegal to create any representation, description or sight of any mechanical part of the device or of any part of the device inside the upholstery of the device.
Any tampering will not only render the warranty invalid, but could alter the therapy provided causing harm to future users.
Returning your BackHug
If you are using your BackHug under a Trial or Subscription Agreement, or you want to dispose of it in an environmentally responsible and ethical manner, please return it to us while following the guidelines below.
Caution: The BackHug device is heavy so please ask a friend or family member for assistance.
Important: Before packing, please take clear photos of your BackHug device from all sides. These photos will constitute evidence of the device's condition prior to shipment. If you fail to take and retain these photos, and the device is damaged in any way when it arrives at our premises, you will be charged for the cost of any repairs or replacement. Please retain all photos for a minimum of 30 days after collection.
Please clean your BackHug device thoroughly (see section 2.12) before returning it.
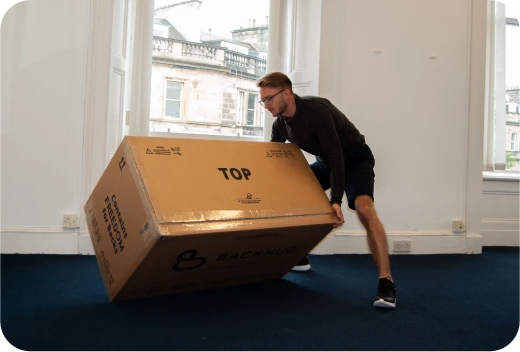
Slide the BackHug device back into the box it arrived in (or a replacement box of similar size and quality), making sure that the top of the BackHug is facing towards the top of the box.
Tape the box shut with packing tape, or other high-strength tape.
Your BackHug is now ready for shipping.
To arange for your BackHug to be collected, please contact a member of the BackHug team (5. Contact Information).
4.1 Reboxing Guide
Take the flat box, the plastic sheet and the air bags, that BackHug arrived

Tape the top together first (making sure the flap that reads "top" is on the top)
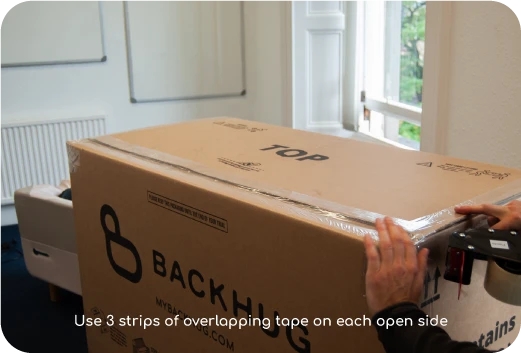
Overlap 3 strips of tape to ensure strength and that the box remains sealed during transit. Tape all 3 sides of the box.

Tip BackHug onto it's side

Your BackHug will have plastic clips to secure the wire to the device. (warning: Failure to secure the cable can result in damaged upholstery during transit.)

Return BackHug onto all fours and place the plastic sheeting over BackHug
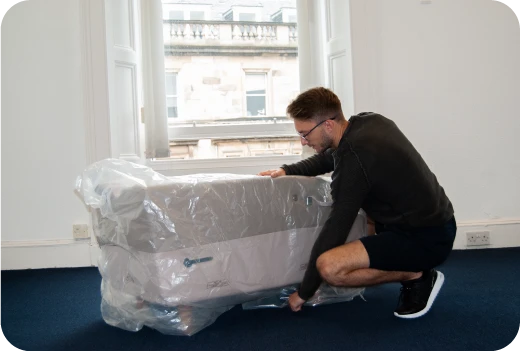
Place the box over BackHug.

Turn the box (now containing BackHug) over and fold the plastic sheet so that it covers the entire device.
Insert one of the air bags inside the other one.
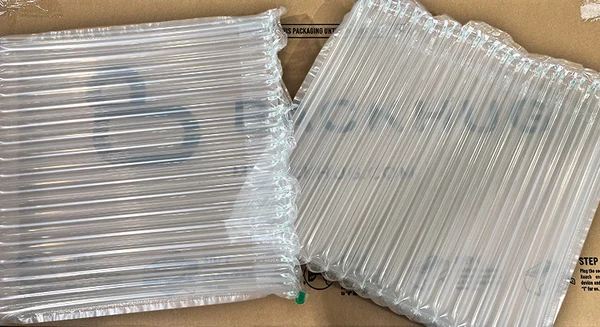
For optimal protection during transportation, follow these packing instructions:
Place three air bags at the top (including the two nested within each other), between the wooden legs of the device. This will reduce the risk of the legs puncturing or damaging the box during transit.
Place one air bag on the side where the leg rest is located. This will help protect the leg rest from potential damage

Seal the box shut. Again, using 3 strips of overlapping tape on each side to ensure strength.
Flip it back the right way around so "Top" is facing upwards.
Your BackHug is now ready to be returned!

Important: Do not remove the wooden legs. The BackHug device must be put in the box with the four wooden legs attached. Not doing so may damage the leg rest.
Specifications
5.1 Classification - Guide to Safety Marks
Symbol
Description


European Conformity

Warning/Caution

Fire Retardant

Separate collection for electric and electronic equipment
DC current

Instructions for use

US and Canadian Conformity

UK Conformity Assessed
5.2 Product Specifications
Voltage: 100-240v~, 2.4GHz
Power Consumption: 224.8W
Environment Temperature: 10℃~40℃
Measurements (mm)
When Parked: L: 1,100 x W: 530 x H: 600 (±5mm)
With Raised Leg-Rest (Max Dimensions): L: 1,250 x W: 530 x H: 830 (±5mm)
User Height
Minimum User Height: 150cm (4ft 11in)
Maximum User Height: 198cm (6ft 5in)
Weight
Maximum Device Weight: 42kg (±2kg)
Maximum Permissible User Weight: 165kg (26st) on the device - excluding Leg Rest
Purpose of Use:
Engineered to relieve back pain
Appliance is intended for household and commercial use
Contact Information